Monday, August 15, 2011

Can I Share?

I have been searching, googling, pinning, repinning and printing all Summer long! Lucky for me, I have found some wonderful sites and blogs that have awesome printables and I thought I would share them with you! I have found tons of worksheets and coloring sheets for the alphabet, numbers, shapes and colors as well as some great learning games for center time! I have now acquired that largest stack of items to copy and laminate for school this year and I could not be more excited!! Enjoy!


Worksheet Universe - I think the title says it all! A site full of worksheets for Preschool, Kindergarten and First Grade.


2 Teaching Mommies - I found some fun spelling practice centers on here as well as some great Bible Verse posters to use with our Bible lessons.


Christian Preschool Printables - great site for Bible crafts, lessons and sheets. I printed off all the Bible Alphabet sheets to go along with our alphabet learning.


Crayola - If you did not know, they have awesome worksheets and coloring sheets on here for Preschool. I use them every year for the alphabet, colors and numbers and love them!
www.crayola.com/free-coloring-pages


Confessions of a Homeschooler - Great printable for leaning!


Ziggity Zoom - Awesome worksheets, coloring sheets, cutting practice as well as learning printables to use in Circle Time.


Twisty Noodle - Love this site! There are so many printables on here and you can customize the wording on them! Love this!


Kid Zone - there is plenty on here to look at but one of my favorites is the Custom Name Tracers. You can type in the child's name and it makes a custom page for the children to learn to write their name!


Handwriting Worksheets - more ways to make Custom handwriting practice sheets


Sunday, August 14, 2011

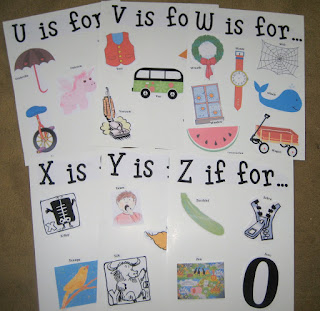
Alphabet Posters


I am so excited about these! During Circle Time in my class, we always try to find as many words we can that begin with the letter we are learning. I decided instead of sitting there racking our sweet little brains, we would make new posters to help us. So, I set out to collect all my clip art I could to find easy enough words for my class. Obviously, some letters are much harder than others but I was so determined to have at least 3-4 words for each letter. Of course, you have those super easy letters where I kept finding about 15 different words and had to cut them down. As you may have figured, X was my challenge. I only wanted words that actually began with the letter, not words that had the letter in it. So, the only two I could come up with were x-ray and xylophone. Upon googling words, I discovered the word xenops which is a bird! Talk about excited to find that new X word!
As always, we will add words when school actually starts - we always talk about children whose names start with each letter and the teachers as well. I took some pictures to show you how cute they turned out. I typed up the headers for each poster - I used small poster board sheets. Then I typed the name of each word on label paper to stick by the picture as well. When I start working in my room this week, I will take them to have laminated so I can keep them for years to come!


Friday, August 12, 2011

Smartie Pants


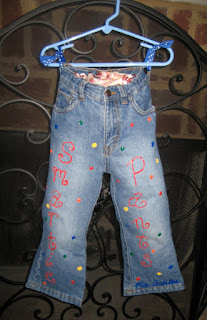
No, I am not calling you names! I have found a super cute idea for a special end of the day treat! While searching around for new and fun ideas for this school year, I came upon a pair of "Smartie Pants." If you know anything about preschoolers, at least at our school, they love two things - Dum Dum Suckers and Smarties! What a fun way to display your treat and to be able to remind children to have a good day so they can visit the "Smartie Pants" at the end of each day. I found the initial idea at The Inspired Apple and decided to make it somewhat my own. I also chose to use this just as a type of display of the treat for the children and on The Inspired Apple, she uses it with older children as an award for an achievement. You can find her stickers and achievement downloads on her blog as well.
I started with a pair of old jeans that my 4 year old son had outgrown last Fall. Next, I sealed the bottoms of the legs with hot glue. Basically, you could say you were done here but if you know me and my crafty side, I had to decorate my "Smartie Pants." Using writing tip paint bottles, I wrote Smartie Pants on the legs and then added bright, colorful dots along with signing my name at the bottom of one leg.
I know I mentioned Dum Dum Suckers in this post as well... be looking in the next few days for a precious way to display this treat!

Wednesday, August 10, 2011

Smell Good Supplies

Random title, I know! I have been busy all Summer gathering different supplies that I like to use. Yes, we have a resource room but there are some things I like to have for myself in my room and a few different types of supplies that no one else uses. A big thing for me this Summer has been finding the perfect ways to dye rice and alphabet pasta. We use both items for art projects with our letters as well as I use them in tupperware containers for the children to go on scavenger hunts. I like to fill up the tubs with the rice or pasta and hide magnetic letters or numbers and let the children go on a hunt for a center.
So, obviously, I needed a significant amount of rice for this activity and why would I want to leave it plain white?! So I set out to dye it all different colors. My first attempt was with a small amount of alcohol mixed with Wilton's gel food colors so I could achieve vibrant colors. Well, it worked well but upon drying left an alcohol odor which I was not a fan of. Plus, when they tell you to lay out and make sure it is completely dry before sealing in an airtight container, listen! I put them in and to my surprise, a few weeks later, a slight bit of mold began to grow on the moist rice which I thought was dry!
So, I found another method where you dye with packets of Kool-Aid. Not only does it work but it leaves your rice smelling good and fruity! Here are the steps I took to achieve my "Smell Good Rice":
1. Below you will find the supplies I used - packets of Kool-Aid, a 4 cup measuring cup, rice and water (not pictured).

2. Pour a packet of Kool-Aid into the measuring and add a small amount of very hot water to dissolve the Kool-Aid completely. Remember, the more liquid, the longer it will take to dry.

3. Begin pouring rice - generally around 2 cups but sometimes I do more if I have to much liquid.

4. After you get your rice poured, you need to stir it all together making sure to coat all the rice well. I use a small rubber spatula and it makes it easy to mix.

5. After you have it all stirred together, it should look like this!

6. Then, spread it all out onto parchment or wax paper to dry. I ran out and used paper towels tonight and it worked just as well!

7. After you have done all the flavors you would like, you will have this fun finished product! Oh, FYI... my brown rice was made with cocoa powder and very hot water. It took a while to mix well and dissolve but it worked! Just do it the same way as the Kool-Aid packets.


Let's have a preschool party!

Hello to everyone! I am so excited about starting this blog so I can share all my fun and creative ideas and projects as well as some fun ways we learn in my classroom. I began teaching preschool in the 3 year old classes and loved it and for the past two years, I have been with 2 year olds. Challenging at times but I love every minute of it! I have been looking for so many new ideas and fun projects to use this school year and cannot wait to share them all with you! It is very true that teachers do not really take the Summer off... I began looking for new ideas the minute school was out last year and have not stopped during the Summer.
I teach at North Shelby Baptist in Birmingham, AL or as our program is known: Tiny Blessings. My goal is to make my classroom a fun environment where the kids are excited to come to each day! I am currently the teacher for the Awesome Alligator room and try to incorporate many alligator things to our class. I am also blessed to have both of my children at the school with me so they are near me each day.
I hope you will follow this blog and that you are able to find so many new ideas and fun learning projects for your own class! I look forward to sharing with you!